OS upgrades and how they affect node availability. Safe evacuation of a node for planned maintenance and bringing it back (§6.2, §6.3).
Releases and versioning, control-plane vs kubelet version compatibility, choosing a target version (§6.4, §6.5).
End-to-end hands-on cluster upgrade: control plane, then nodes, with minimal disruption (§6.6, §6.7).
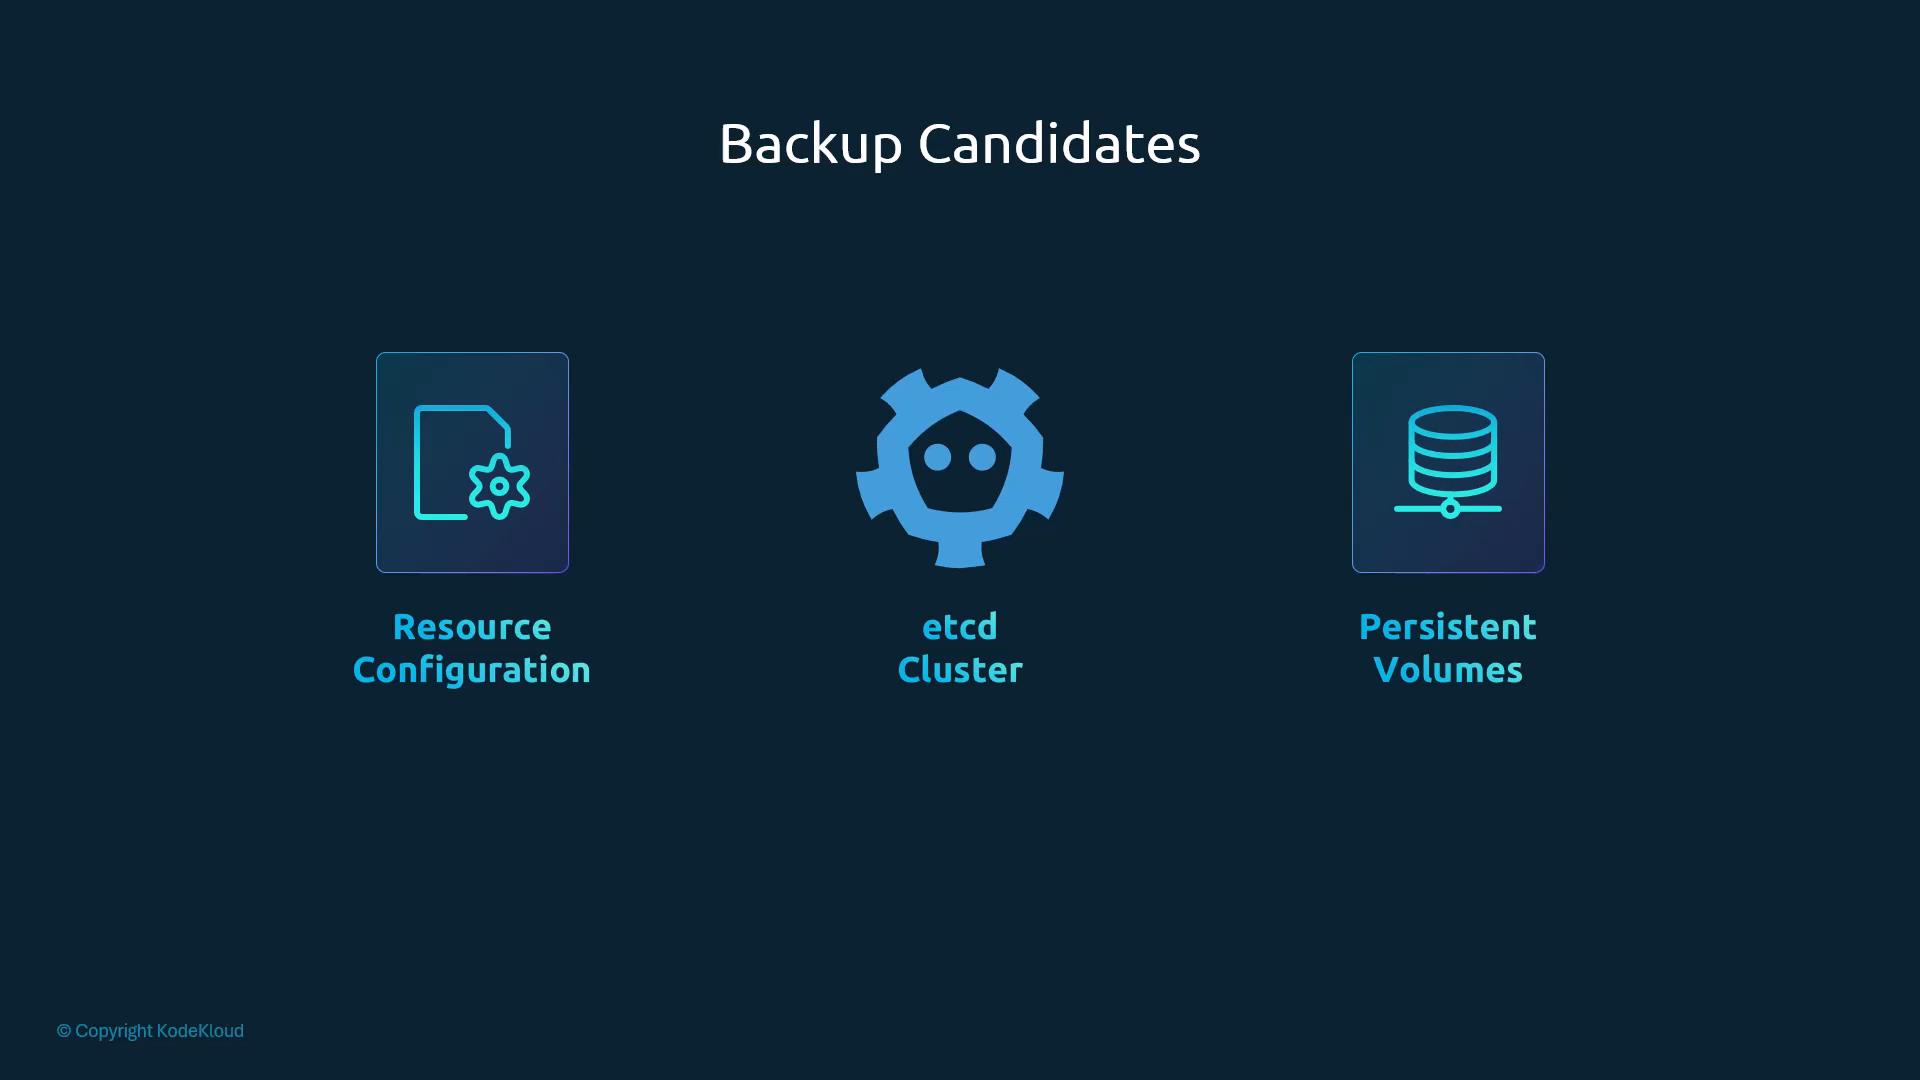
Backup and restore of cluster state and application data, plus a disaster-recovery exercise (§6.8).
Before any OS or Kubernetes upgrade, plan the maintenance window and take backups. Rehearse the upgrade and the rollback in a staging cluster that mirrors production.
kubectl cordon <node-name> # 1. mark unschedulable (no new pods)kubectl drain <node-name> --ignore-daemonsets --delete-emptydir-data --force # 2. evict pods (current flags; see CAUTION)# 3. perform OS/firmware maintenance or reboot the nodekubectl get nodes # 4. node back to Ready?journalctl -u kubelet # kubelet healthy? (run on the node)kubectl uncordon <node-name> # 5. allow scheduling againkubectl get pods -o wide # 6. pods scheduling? then app health checks + metrics
Use --force only when you have to. Don't throw away local data of stateful workloads unless they are replicated.
Drain respects PodDisruptionBudgets. If a PDB blocks eviction, either wait or adjust the budget for the maintenance window.
PDBs and readiness probes together limit how many replicas can be evicted at once, which keeps the app up during maintenance.
[!CAUTION]
Correction:--delete-local-data is removed in current kubectl. Use --delete-emptydir-data. Also, kubectl drain cordons the node itself, so the separate cordon step is redundant (but harmless).
Releases come on a regular cadence. Every minor release brings features, deprecations and bug fixes, so read its release notes for breaking changes.
Version skew policy: only limited skew is allowed between the control plane (API server, controller-manager, scheduler) and kubelet/node components. Therefore upgrade the control plane first, then the nodes (details in §6.5). Check the official skew policy for your exact versions.
Pick a target version that is: stable and non-deprecated; supported by your cloud provider or distribution; validated in staging against your workloads and third-party controllers.
Pre-upgrade checklist:
etcd snapshot + persistent application data backed up.
Monitoring, logging and alerting working.
Third-party controllers, CRDs and operators support the target version.
Upgrade the control plane (API server, controller-manager, scheduler). On kubeadm clusters: kubeadm upgrade apply <version>. On managed control planes (GKE/EKS/AKS): use the provider's upgrade workflow.
Check control-plane health and API compatibility.
Upgrade kube-proxy and CoreDNS/core add-ons if needed.
Upgrade worker nodes one at a time: cordon + drain → upgrade kubelet/kube-proxy and the container runtime → uncordon.
Watch workloads and metrics after each node. Roll back if something breaks.
Hands-on end-to-end exercise:
Pre-upgrade: full etcd snapshot. Validate app backups and test a restore in staging. All nodes Ready, no pods stuck in restart loops.
Control plane: follow the documented steps for your cluster type (kubeadm, hosted, cloud). Check component health with kubectl get componentstatuses / kubectl get cs.
Nodes, one at a time: kubectl cordon → kubectl drain → OS/kernel/runtime patches → restart kubelet → validate → kubectl uncordon.
Post-upgrade: integration, smoke and performance tests. Watch metrics and logs for anything abnormal.
[!CAUTION]
Correction: the course’s kubectl get componentstatuses (cs) has been deprecated since v1.19 and is unreliable. Check control-plane health with kubectl get pods -n kube-system and kubectl get --raw='/readyz?verbose'.
Its pods become unreachable. User impact depends on how they were deployed:
Multi-replica Deployment/ReplicaSet (the "blue" app): the other replicas keep serving, so users are usually unaffected.
Single standalone pod (the "green" app): downtime.
If the node comes back quickly (kubelet resumes), its pods just keep running.
If it stays unreachable longer than the eviction timeout, the control plane treats its pods as dead and evicts them.
When the node controller sees a node NotReady/unreachable, it adds a NoExecute taint, e.g. node.kubernetes.io/unreachable. Pods without a matching toleration are evicted after the grace period.
Timeout: kube-controller-manager --pod-eviction-timeout, default 5m0s. Node back in time → pods stay. Otherwise → evicted, and controllers create replacements on other nodes.
A pod can tolerate the taint and set its own limit for staying on an unhealthy node:
apiVersion: v1kind: Podmetadata: name: tolerant-appspec: containers: - name: app image: nginx tolerations: - key: "node.kubernetes.io/unreachable" operator: "Exists" effect: "NoExecute" tolerationSeconds: 3600 # stay up to 1h on an unreachable node before eviction
Recreated on the original node when its kubelet returns
Node-offline sequence: node NotReady → node controller adds NoExecute taint → waits up to --pod-eviction-timeout (5 min) → evicts pods without a toleration, and controller-managed pods are recreated elsewhere. (Timeline diagram: §2.8.)
[!CAUTION]
Correction:--pod-eviction-timeout was removed from kube-controller-manager (v1.27). Eviction is purely taint-based now. The DefaultTolerationSeconds admission plugin gives every pod tolerations for node.kubernetes.io/not-ready and node.kubernetes.io/unreachable (NoExecute) with tolerationSeconds: 300, so the default is still ~5 min. Tune it per pod with tolerationSeconds as in the YAML above.
kubectl drain node-1 # cordon + evict pods (pods recreated elsewhere by their controllers)kubectl cordon node-1 # only mark unschedulable; existing pods keep runningkubectl uncordon node-1 # make schedulable again
kubectl drain:
Cordons the node (unschedulable).
Evicts pods gracefully, subject to PDBs. It won't evict if that would violate a PDB.
Mirror pods (static pods) are ignored.
DaemonSet pods: ignored only when you pass --ignore-daemonsets. Otherwise drain aborts (see CAUTION below).
Unmanaged (standalone) pods: drain refuses to evict them unless you pass --force.
Behaviour to remember:
Pods are not "moved". Drained pods are terminated, and their controllers notice the missing replicas and create new pods on other nodes.
After uncordon, pods do not move back automatically. Only newly scheduled pods can land on the node again.
Diagram (new): drain sequence and what happens to each pod type, with the flag it needs.
Evicts pods using local storage (emptyDir). That data is lost
Only if the local data can be discarded or is replicated
--force
Evicts/deletes unmanaged pods. They are not recreated
Only if you must empty the node and have another recovery plan
[!CAUTION]
Correction: The course table calls --ignore-daemonsets "default behaviour". It isn't. Without the flag, drain aborts with cannot delete DaemonSet-managed Pods (use --ignore-daemonsets to ignore) (see §6.3). --delete-local-data was replaced by --delete-emptydir-data; the old flag is removed in current kubectl (unknown flag).
[!NOTE]
Beyond the course: Check PDBs before draining with kubectl get pdb -A. While a PDB blocks it, drain keeps retrying the eviction. --timeout=<dur> bounds that wait, and --disable-eviction bypasses PDBs by deleting pods directly (use with care).
For planned OS upgrades or reboots, drain first so replicas are recreated elsewhere before the node restarts.
If the workload is highly available and the node will be back quickly, a short reboot without draining can work. It is risky, though: if the node stays down past the eviction timeout, its pods get evicted anyway.
Before draining, look for PDBs and critical unmanaged pods. Drain can be blocked until the PDB's availability guarantee can be met.
Static/mirror pods behave differently: the kubelet recreates them on the same node.
Test drain/uncordon behaviour (including PDB interaction) in staging.
[!WARNING]
Exam traps / remember:
drain = cordon + evict. cordon = no new pods, existing ones stay. uncordon = schedulable again, but nothing moves back.
Standalone pods are lost on --force drain or eviction. Only controller-managed pods come back elsewhere.
Using --force / --delete-emptydir-data can cause data loss (emptyDir) or downtime. Prefer replication and graceful eviction.
Lab: controlplane + node01 (v1.20.0). Deployment blue (3 replicas) all running on node01. Theory: §6.2.
Task
Command / answer
Gotcha
Speed alias
alias k=kubectl
How many nodes / which apps
k get nodes → 2 nodes; k get deploy → blue 3/3
Which nodes are the app pods on?
k get pods -o wide (NODE column) → all on node01
Check this before any maintenance
Take node01 out for maintenance (empty it)
k drain node01 → fails: cannot delete DaemonSet-managed Pods (use --ignore-daemonsets to ignore): kube-system/kube-flannel-ds-…, kube-system/kube-proxy-… → k drain node01 --ignore-daemonsets
The failed attempt still cordons the node (node/node01 cordoned), and the retry prints already cordoned
Where did the pods go?
k get pods -o wide → all 3 blue pods now on controlplane
New pod names: they were recreated, not moved
Why could controlplane take them?
k describe node controlplane → Taints: <none>, Unschedulable: false
This lab’s CP has no taints; see the beyond-course note below for the kubeadm default
Maintenance done; make node01 schedulable
k uncordon node01
Pods stay on controlplane; nothing moves back
Next window: drain fails again
k drain node01 --ignore-daemonsets → cannot delete Pods not managed by ReplicationController, ReplicaSet, Job, DaemonSet or StatefulSet (use --force to override): default/hr-app
Find it with k get pods -o wide → hr-app is a plain Pod on node01
What happens with --force?
kubectl drain node01 --ignore-daemonsets --force → WARNING: deleting Pods not managed by …: default/hr-app → evicted
hr-app is lost forever, not recreated. Unacceptable for a critical app
Fix: hr-app redeployed as a Deployment
k get deploy → hr-app 1/1; pod hr-app-76d475c57d-… on node01
Now controller-managed, so it can be evicted and recreated safely in future drains
Keep critical hr-app on node01 but block new pods there
k cordon node01
Cordon = unschedulable, existing pods keep running. Don't drain here
[!NOTE]
Beyond the course: The lab's k describe node output shows kubeadm.alpha.kubernetes.io/cri-socket: /var/run/dockershim.sock and the role control-plane,master. Both are pre-v1.24: dockershim is gone, so today's socket is unix:///var/run/containerd/containerd.sock, and the master role/taint was replaced by node-role.kubernetes.io/control-plane.
[!WARNING]
Exam traps / remember:
A failed drain leaves the node cordoned. If you abandon the drain, uncordon it.
Answer "make node unschedulable without moving pods" with cordon. Answer "evacuate / prepare for maintenance" with drain --ignore-daemonsets.
Run critical workloads under controllers so they survive drains.
[!NOTE]
Beyond the course: kubeadm normally taints control-plane nodes node-role.kubernetes.io/control-plane:NoSchedule. The lab deliberately permits workloads there.
[!CAUTION]
Correction: the course says a minor release roughly every three months; since 2021 (v1.21 onward) Kubernetes ships three minor releases a year (~every 15 weeks, roughly 4 months), not four. Patch support per minor is ~14 months (12 months + a 2-month upgrade window).
Production-ready. No incompatible changes expected
[!NOTE]
Beyond the course: Since v1.24, new beta APIs are disabled by default and need --runtime-config on the API server. Beta feature gates are still generally on.
The release tarball kubernetes.tar.gz contains binaries that all share the same version: kube-apiserver, kube-controller-manager, kube-scheduler, kubelet, kube-proxy, kubectl.
etcd and CoreDNS are separate projects with their own versions. Each Kubernetes release documents the etcd versions it supports/tested and the CoreDNS compatibility. Check these in the release notes before installing or upgrading.
[!WARNING]
Exam traps / remember:
kubectl get nodes VERSION is the kubelet version, not the control-plane version (check that with kubectl version or kubeadm upgrade plan).
Minor = features, patch = bug/security fixes. Alpha features are off by default.
etcd/CoreDNS versions do not follow Kubernetes versions.
Patch support per minor: v1.19+ ≈ 1 year; v1.18 and older ≈ 9 months.
Focus: kubeadm-managed clusters; the control-plane components (kube-apiserver, kube-controller-manager, kube-scheduler) and the node components (kubelet, kube-proxy). External dependencies (etcd, CoreDNS) need their own consideration in production.
Components don't all have to run the same version, but they must stay within the skew policy. That is what makes live, one-component-at-a-time upgrades possible.
Component
Allowed version vs kube-apiserver (X)
kube-apiserver
Reference. Must be the highest in the control plane
kube-controller-manager, kube-scheduler
X or X-1
kubelet, kube-proxy
X, X-1 or X-2
kubectl
X+1, X, X-1 (more flexible)
Example with apiserver v1.10: controller-manager/scheduler v1.10 or v1.9. kubelet/kube-proxy v1.10, v1.9 or v1.8. Nothing at v1.11 (newer than the API server), except kubectl may be.
Diagram (new): skew window per component. The dashed X-3 cell is the current upstream policy.
[!NOTE]
Beyond the course: Since v1.28, kubelet and kube-proxy may be up to three minor versions older than the API server (X-3). Neither may be newer than the API server. In HA control planes, all kube-apiserver instances must be within one minor version of each other.
[upgrade/versions] Cluster version: v1.11.8[upgrade/versions] kubeadm version: v1.11.3[upgrade/versions] Latest stable version: v1.13.4[upgrade/versions] Latest version in the v1.11 series: v1.11.8Components that must be upgraded manually after you haveupgraded the control plane with 'kubeadm upgrade apply':COMPONENT CURRENT AVAILABLEKubelet 3 x v1.11.3 v1.13.4Upgrade to the latest stable version:COMPONENT CURRENT AVAILABLEAPI Server v1.11.8 v1.13.4Controller Manager v1.11.8 v1.13.4Scheduler v1.11.8 v1.13.4Kube Proxy v1.11.8 v1.13.4CoreDNS 1.1.3 1.1.3Etcd 3.2.18 N/AYou can now apply the upgrade by executing the following command:kubeadm upgrade apply v1.13.4Note: Before you can perform this upgrade, you have to update kubeadm to v1.13.4.
The plan shows: cluster version, kubeadm version, latest stable, latest in the current series, the components to upgrade, and the reminder that kubelets are upgraded manually.
kubeadm does not install or upgrade kubelet. Upgrade the kubeadm binary to the target minor first (e.g. v1.12.x before kubeadm upgrade apply v1.12.x). Then upgrade the control plane, then kubelet/kube-proxy on each node.
apt-get updateapt-get install -y kubeadm=1.12.0-00 # 1. kubeadm to the target minor firstkubeadm upgrade apply v1.12.0 # 2. control plane# [upgrade/successful] SUCCESS! Your cluster was upgraded to "v1.12.0".# [upgrade/kubelet] Now that your control plane is upgraded, please proceed with upgrading your kubelets ...kubectl get nodes # still shows v1.11.3 (kubelet versions)# kubeadm runs control-plane components as static pods, so masters run a kubelet too:apt-get install -y kubelet=1.12.0-00systemctl restart kubeletkubectl get nodes # master v1.12.0, node-1/node-2 v1.11.3
kube-proxy: when it runs as a DaemonSet from cluster-level manifests (kubeadm), kubeadm upgrade apply may update its image, so verify afterwards. In other setups, upgrade it manually.
To reach v1.13, repeat the whole cycle: kubeadm on the control plane → kubeadm upgrade apply v1.13.x → kubelet on each node, one at a time (+ kube-proxy if needed).
[!CAUTION]
Correction (outdated commands):
kubeadm upgrade node config --kubelet-version v1.12.0 no longer exists. Run plain kubeadm upgrade node on each worker (and on additional control-plane nodes).
kubeadm=1.12.0-00 is the version format of the frozen apt.kubernetes.io repo. With pkgs.k8s.io it is 1.29.3-1.1, and you must switch the repo for each minor (see §6.6).
kubectl drain node-1 fails on any real node because of DaemonSet pods. Use kubectl drain node-1 --ignore-daemonsets.
Run systemctl daemon-reload before systemctl restart kubelet after a package upgrade.
Read release notes for every intermediate minor version.
Back up etcd (cluster state).
Upgrade kubeadm on the machine that runs the upgrade.
kubeadm upgrade plan, and confirm the versions.
kubeadm upgrade apply <target> for the control plane.
Upgrade kubelet (and kube-proxy where needed) on nodes, using drain/uncordon for a rolling upgrade.
Validate the cluster and workloads.
[!WARNING]
Exam traps / remember:
Back up etcd and read the release notes before upgrading. Some versions need manual steps for third-party components (etcd, CNI). Skipping either can cause outages you cannot recover from.
Upgrade kubeadm beforeupgrade apply. kubeadm can't apply a minor newer than itself.
upgrade apply leaves the kubelet untouched. Every node, control plane included, needs its kubelet package upgraded and restarted.
Draining marks the node unschedulable and uncordon reverses it. Where pods land afterwards is up to the scheduler.
Legacy Google-hosted repos apt.kubernetes.io / yum.kubernetes.io: deprecated Aug 31, 2023, frozen Sep 13, 2023, removed early 2024. Moving to the new repos was an opt-in, manual migration.
The community repos at pkgs.k8s.io are required for versions released after Sep 13, 2023, and carry v1.24.0 onward.
There is one repo per minor version. To upgrade, point the repo at the target minor (v1.29) on every node, control plane and workers.
sudo mkdir -p /etc/apt/keyringscurl -fsSL https://pkgs.k8s.io/core:/stable:/v1.29/deb/Release.key | \ sudo gpg --dearmor -o /etc/apt/keyrings/kubernetes-apt-keyring.gpgecho "deb [signed-by=/etc/apt/keyrings/kubernetes-apt-keyring.gpg] https://pkgs.k8s.io/core:/stable:/v1.29/deb/ /" | \ sudo tee /etc/apt/sources.list.d/kubernetes.listsudo apt updatesudo apt-cache madison kubeadm # list versions; pick the LATEST patch, e.g. 1.29.3-1.1
Note the exact package string (1.29.3-1.1). You use it for kubeadm, kubelet and kubectl.
[!NOTE]
Beyond the course: if the node already uses pkgs.k8s.io, you only need to change the version in the repo file: sudo sed -i 's/v1.28/v1.29/' /etc/apt/sources.list.d/kubernetes.list && sudo apt update. The signing key is the same for every minor.
same unhold/install/hold as step 6, then sudo systemctl daemon-reload && sudo systemctl restart kubelet
kubectl optional on workers
14. Uncordon + verify
kubectl host
kubectl uncordon node01 → kubectl get nodes
Both v1.29.3. Repeat 10–14 for each worker
[!CAUTION]
Correction: The course's worker step says to run sudo kubeadm upgrade node "from a control-plane node". It must run on the worker itself, because it rewrites that node's local kubelet config. On additional control-plane nodes, kubeadm upgrade nodereplaceskubeadm upgrade apply (no plan needed there).
[!NOTE]
Beyond the course:kubeadm upgrade apply also renews the control-plane certificates by default (--certificate-renewal=true), and it asks for [y/N] confirmation. Add -y/--yes to skip the prompt.
[!WARNING]
Exam traps / remember:
After kubeadm upgrade apply, nodes keep reporting the old version until their kubelet is upgraded and restarted.
Change the repo to the target minor on every node before apt-get install. Otherwise apt-cache madison only lists the old minor.
Use the latest patch of the target minor, with the exact package string. Upgrade one node at a time.
Check CNI/add-on docs for version-specific steps, and test in staging first.
Lab: controlplane + node01 on v1.19.0 → upgrade to v1.20.0. Deployment blue with 5 replicas spread over both nodes. Constraints: no new VMs and no user impact. Procedure: §6.6.
Task
Command / answer
Gotcha
Current version
alias k=kubectl; k get nodes → v1.19.0
Can workloads run on both nodes?
k describe node controlplane | grep Taints and k describe node node01 | grep Taints → Taints: <none> on both
An untainted CP can host app pods during a rolling upgrade. If the CP were tainted and there was only 1 worker, you'd need extra capacity or a maintenance window
Apps and where they run
k get deploy → blue 5/5; k get pods -o wide
Pods are spread over controlplane and node01
Strategy (no new VMs, no downtime)
Upgrade one node at a time, draining each so pods move to the other node. Control plane first
"All at once" causes downtime. "Add new nodes" isn't possible here
Latest version available with the current kubeadm
kubeadm upgrade plan → v1.19.16 (Latest version in the v1.19 series)
Output includes remote version is much newer: v1.23.5; falling back to: stable-1.19. kubeadm only offers versions up to its own minor. Upgrade the kubeadm binary to get 1.20
OS / available packages
cat /etc/*release* → Ubuntu 18.04; apt update; apt-cache madison kubeadm
Keep the package version the same for kubeadm, kubelet and kubectl (e.g. all 1.20.0-00)
1. Drain CP
k drain controlplane --ignore-daemonsets
Also evicts the coredns pods. k get nodes → Ready,SchedulingDisabled
Run kubeadm upgrade nodeon node01, not on the CP. Remember to exit back to the CP
8. Uncordon worker
k get nodes (node01 Ready,SchedulingDisabled, v1.20.0) → k uncordon node01
Both nodes Ready on v1.20.0
Verify between steps: kubectl get nodes, kubectl get pods -A (the course also uses kubectl get cs, which is deprecated, see §6.1). Pods reschedule according to Deployment settings and any PDBs.
[!CAUTION]
Correction:1.20.0-00 and http://apt.kubernetes.io kubernetes-xenial are from the frozen legacy repo. Current labs/exam use pkgs.k8s.io: switch the repo to the target minor first, then use package versions like 1.xx.y-1.1 (§6.6).
[!WARNING]
Exam traps / remember:
Confirm add-ons (CNI, CoreDNS, kube-proxy) support the target version. Back up etcd and test the path outside production first.
Exam-style tasks often say "upgrade the control plane and node01 to exactly vX.Y.Z". Use that exact version in kubeadm upgrade apply and in the package versions.
kubeadm refuses to apply a minor version newer than the kubeadm binary itself.
kubeadm upgrade plan (kubeadm v1.19.0) output: Latest version in the v1.19 series: v1.19.16 · kubelet 2 x v1.19.0 → v1.19.16 (manual) · You can now apply the upgrade by executing: kubeadm upgrade apply v1.19.16 · Note: Before you can perform this upgrade, you have to update kubeadm to v1.19.16. → so the plan only offers targets up to kubeadm's own minor.
Docs 'Before you begin': read the release notes; the cluster must run a static-pod control plane and etcd pods (or external etcd); back up important components, e.g. app-level state in databases (kubeadm upgrade does not touch workloads).
Declarative manifests kept in Git (GitHub/GitLab) are the best practice: reproducible, auditable, CI/CD/GitOps-friendly. If the cluster is lost, redeploy from the repo.
Objects created imperatively have no manifest file, so export the live state from the API:
kubectl get all --all-namespaces -o yaml > all-deploy-services.yaml # quick capture of common workload objects
get all is not everything. It skips PVCs, PVs, CRDs, ClusterRoleBindings and more. For full coverage, use a tool such as Velero (https://velero.io, resources + PVs), or a script that enumerates types from kubectl api-resources.
[!NOTE]
Beyond the course: a scripted export of every listable namespaced type:
for r in $(kubectl api-resources --verbs=list --namespaced -o name); do kubectl get "$r" -A -o yaml > "backup-${r}.yaml"done
etcd holds object definitions, node membership and most cluster metadata. Back it up by copying its data directory or by taking a snapshot. Basics: §2.5/§2.6. HA: §10.4.
ETCDCTL_API=3 etcdctl snapshot save snapshot.db # basic form (use the v3 API)ETCDCTL_API=3 etcdctl \ --endpoints=https://127.0.0.1:2379 \ --cacert=/etc/etcd/ca.pem \ --cert=/etc/etcd/kubernetes.pem \ --key=/etc/etcd/kubernetes-key.pem \ snapshot save snapshot.db # TLS-secured etcd: endpoint + CA + client cert/key requiredls -l snapshot.db # verify the file exists
If more than one etcdctl binary is installed, make sure you use the v3 client (ETCDCTL_API=3) and that it is compatible with the server version.
On TLS-enabled etcd, always pass --endpoints, --cacert, --cert and --key. Without them etcdctl can't connect.
A restore creates fresh cluster metadata (new member IDs). A restored data dir does not rejoin an existing cluster on its own. Set --initial-cluster, --name and --initial-cluster-state to match your intent: form a new cluster, or rejoin.
On kubeadm clusters, etcd and kube-apiserver are static pods. Stop or replace them through their manifests rather than with systemctl.
[!NOTE]
Beyond the course (kubeadm restore, the usual exam case):
# Cert paths: cat /etc/kubernetes/manifests/etcd.yaml (or kubectl -n kube-system describe pod etcd-controlplane)ETCDCTL_API=3 etcdctl --endpoints=https://127.0.0.1:2379 \ --cacert=/etc/kubernetes/pki/etcd/ca.crt \ --cert=/etc/kubernetes/pki/etcd/server.crt \ --key=/etc/kubernetes/pki/etcd/server.key \ snapshot save /opt/snapshot.dbetcdutl snapshot status /opt/snapshot.db -w table # verify (or: etcdctl snapshot status)# restore is local file work: no TLS flags needed; target dir must not already existetcdutl snapshot restore /opt/snapshot.db --data-dir /var/lib/etcd-from-backup# (deprecated but still works: ETCDCTL_API=3 etcdctl snapshot restore ...)# then edit /etc/kubernetes/manifests/etcd.yaml → volumes: etcd-data hostPath.path: /var/lib/etcd-from-backup# the kubelet recreates the etcd static pod; watch with: crictl ps | grep etcd ; kubectl get pods -n kube-system
etcdctl snapshot restore is deprecated in etcd 3.5 in favour of etcdutl snapshot restore. Both may be present in the exam environment.
Only the objects you export (Deployments, Services, ConfigMaps…). Excludes cluster-level binary state and some status fields
You want portability or version control, or you're on managed K8s with no etcd access
etcd snapshot
Full cluster state, incl. Secrets and status
You have control-plane access, need a full point-in-time restore, and can handle bootstrap + certs
PV backups
App data (volume snapshots, file copies, provider snapshots)
Always for stateful apps. Separate from manifests/etcd
Managed K8s (EKS/GKE/AKS): usually no etcd access. Use the provider's backup features, or manifests + PV snapshots.
Secrets: an etcd snapshot includes them. Manifest-only backups can lose them, so keep them in an external secret store or back them up securely.
Consistency: coordinate etcd snapshots with PV snapshots. App-consistent backups need the app quiesced, or storage-provider volume snapshots.
[!WARNING]
Exam traps / remember:
etcdctl snapshot save on a TLS cluster needs all four flags: --endpoints, --cacert, --cert, --key. Take the paths from the etcd manifest/unit.
Restore into a new directory, then repoint etcd's data dir (--data-dir in the unit, or the hostPath in the static-pod manifest). Stop kube-apiserver first on systemd setups.
kubectl get all misses many resource types. etcd snapshots don't contain PV data.
[!NOTE]
Beyond the course: the export loop above covers namespaced types only. Also export cluster-scoped objects (RBAC, PVs, CRDs, StorageClasses, etc.):
for r in $(kubectl api-resources --verbs=list --namespaced=false -o name); do kubectl get "$r" -o yaml > "backup-cluster-${r}.yaml"done
Resource exports do not back up volume data or make all exported objects immediately restorable.

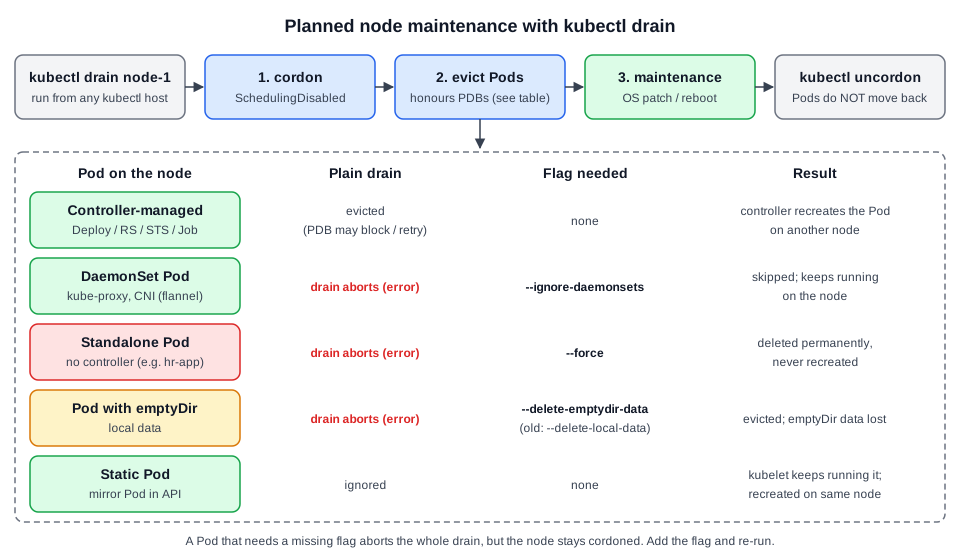 Diagram (new): drain sequence and what happens to each pod type, with the flag it needs.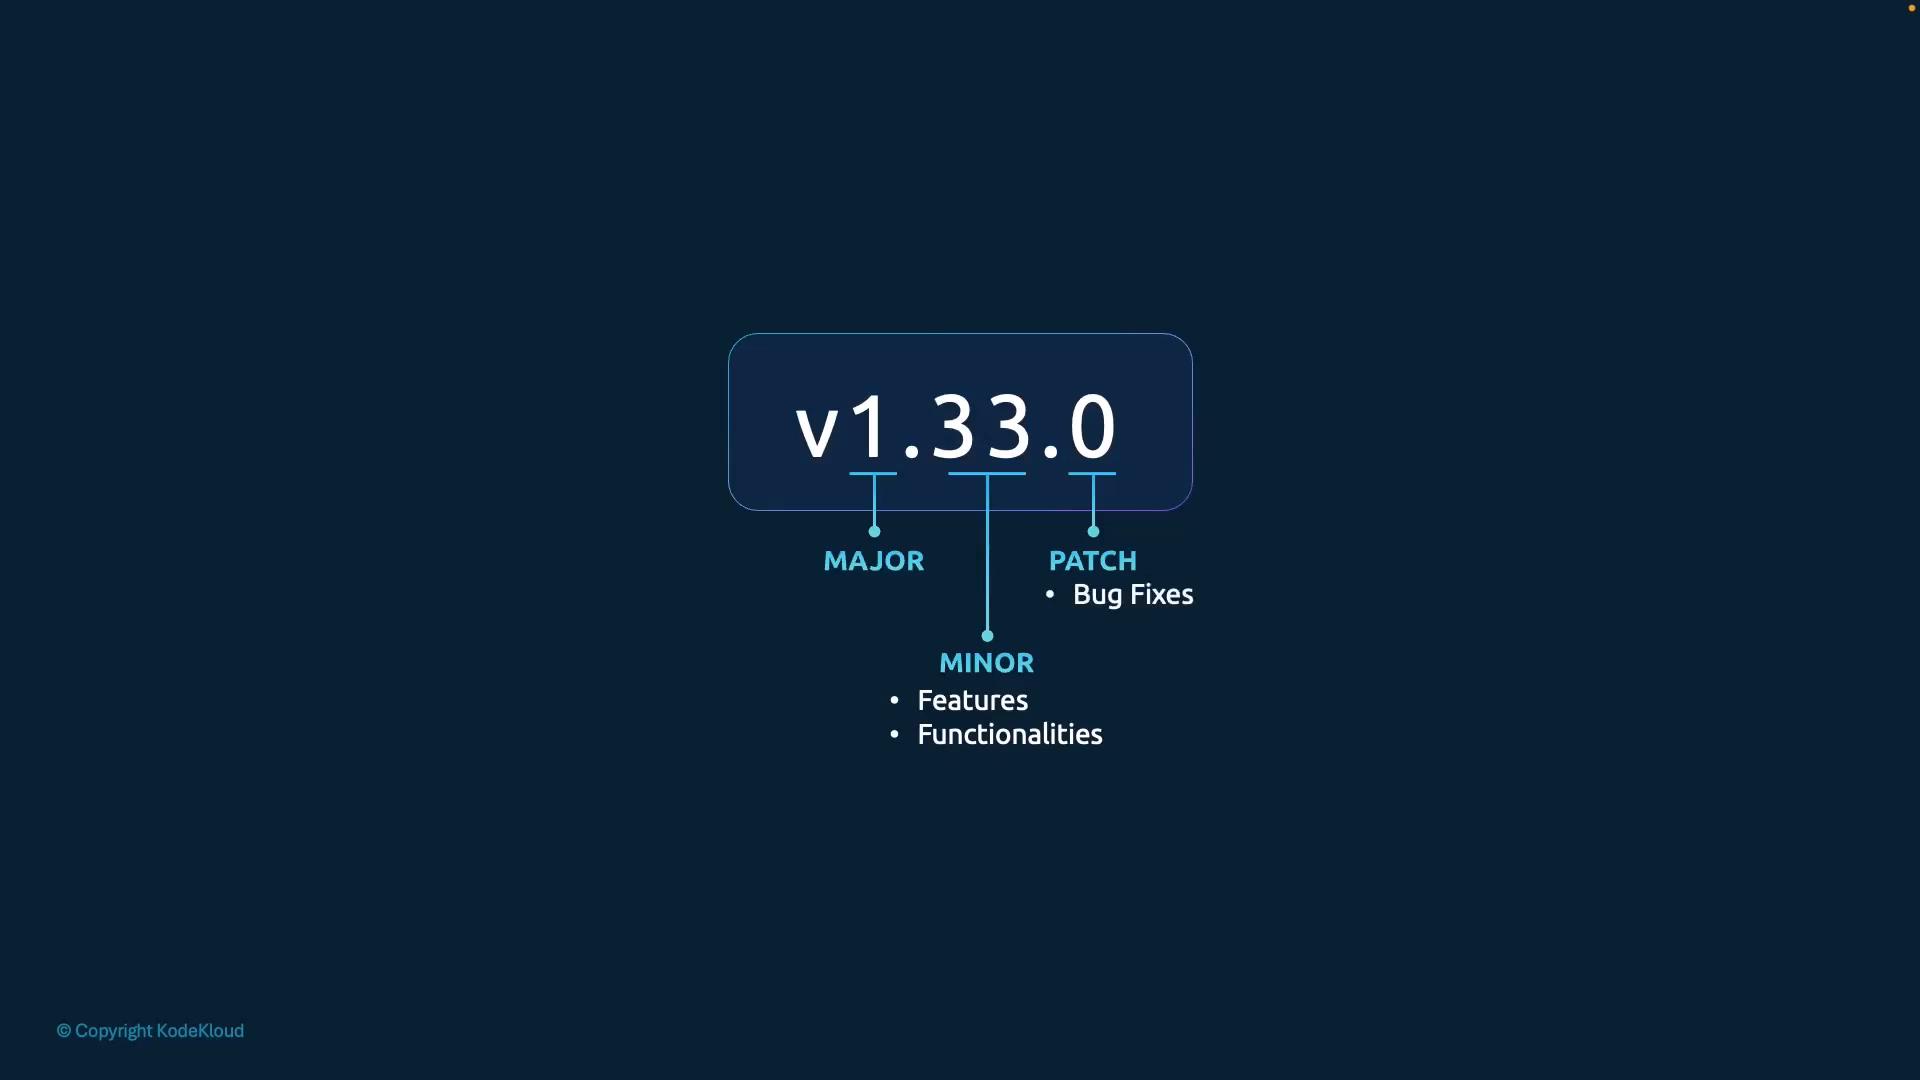
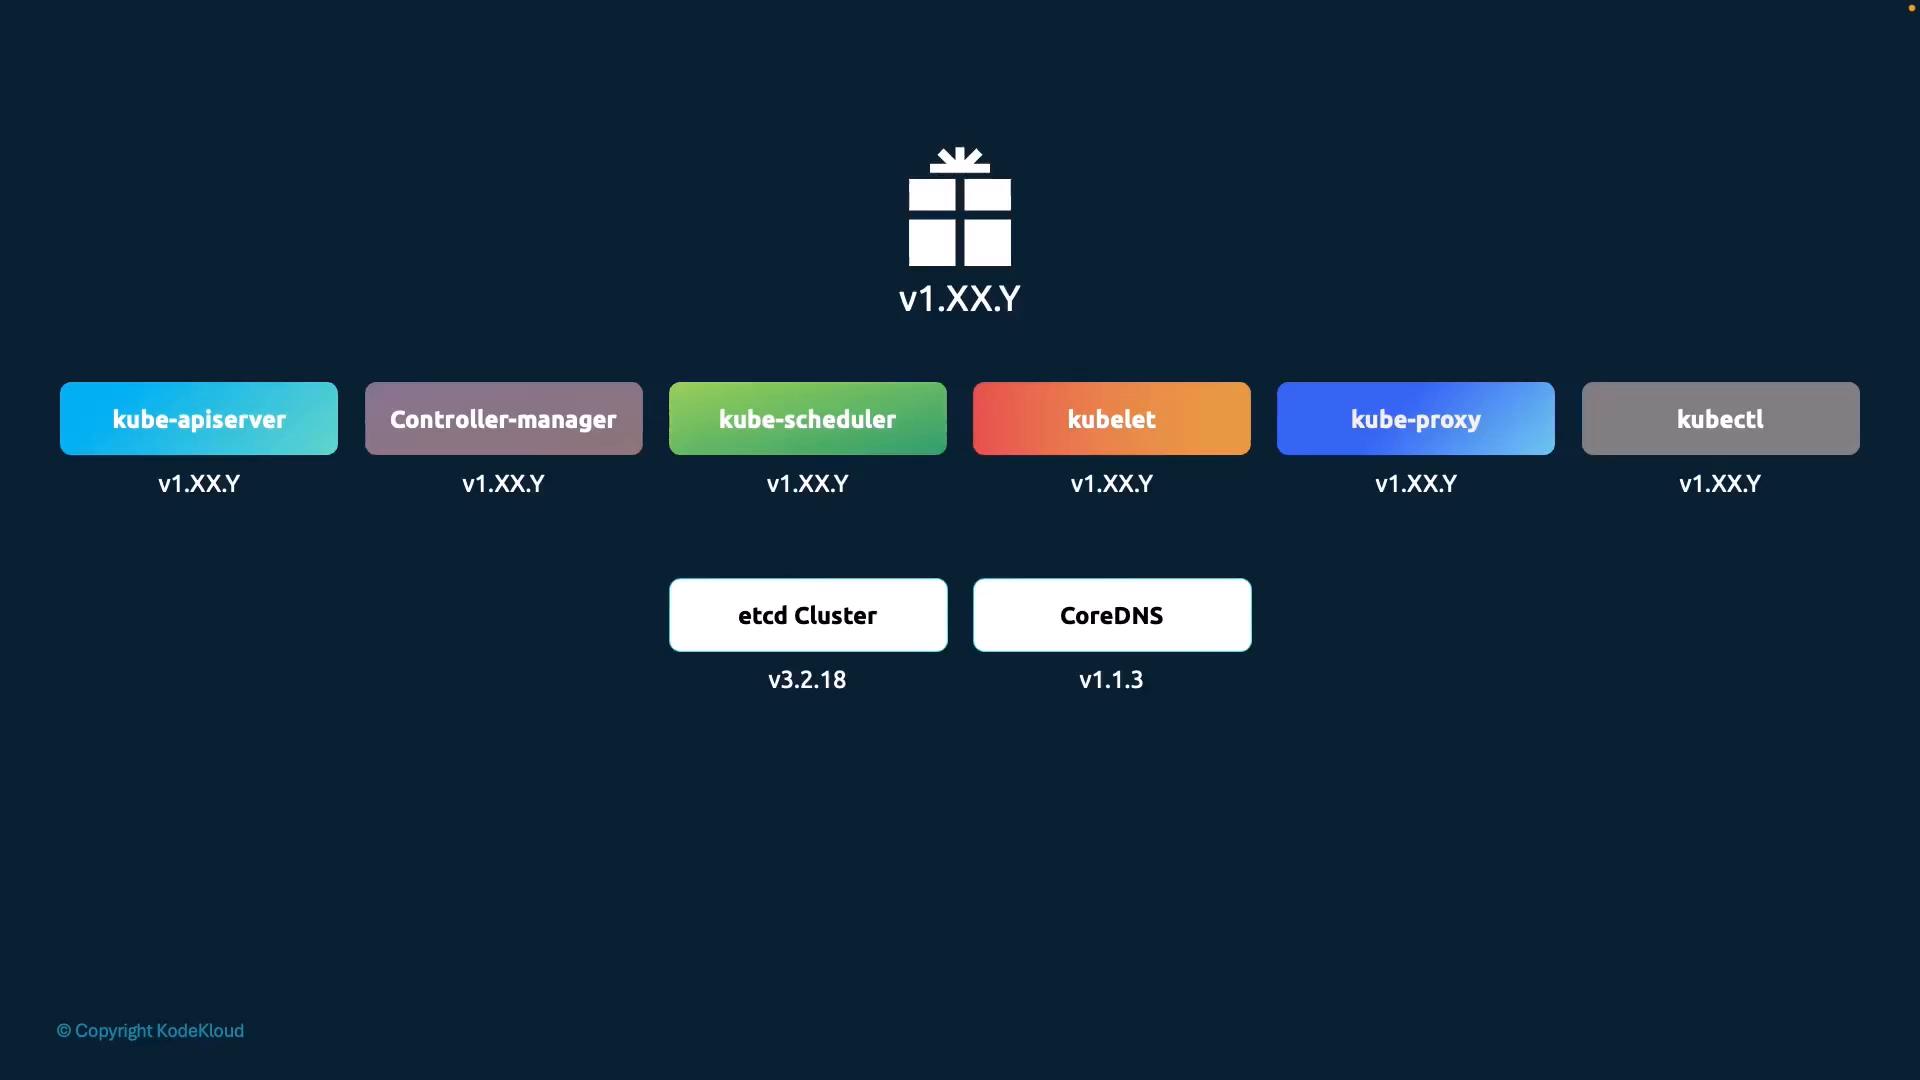
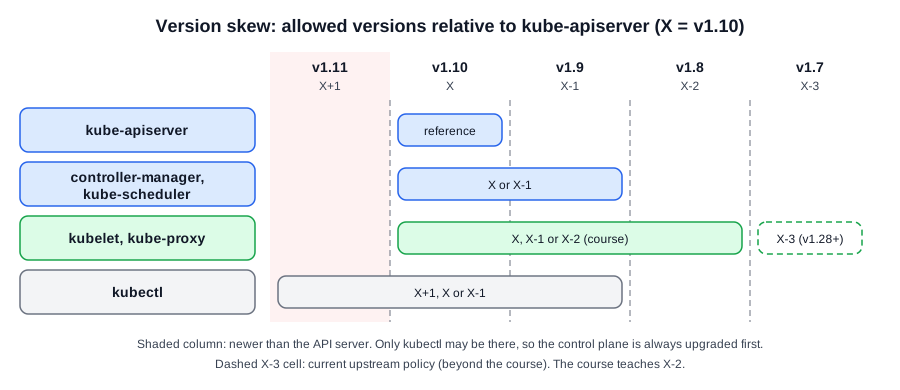 Diagram (new): skew window per component. The dashed X-3 cell is the current upstream policy.
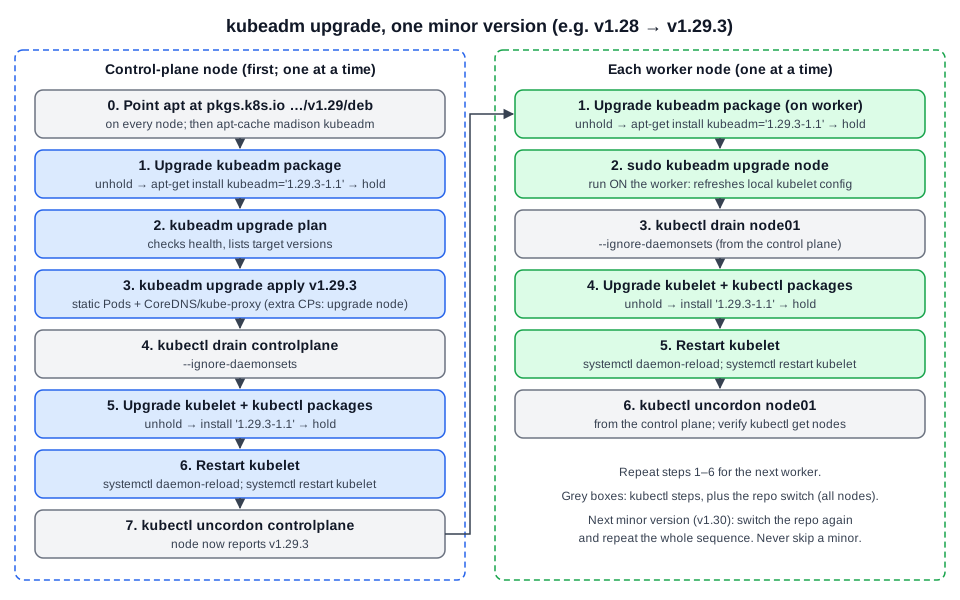 Diagram (new): order of steps on the control-plane node, then on each worker.