Bootstrapping tool for a best-practice multi-node cluster. It replaces the manual work of installing each component on each host, generating and distributing certificates, and writing config files.
Installs and configures the control-plane components (kube-apiserver, etcd, controller-manager, scheduler) and configures the kubelet on every node.
Generates and manages the TLS assets and kubeconfig files so the components can talk to each other securely.
Writes static pod manifests for the control-plane components and etcd (etcd only when it is stacked, i.e. not external). See §3.16 for static pods.
Uses best-practice defaults, all of which can be customised.
# Container runtime (all nodes)sudo apt-get updatesudo apt-get install -y containerdsudo mkdir -p /etc/containerdcontainerd config default | sudo tee /etc/containerd/config.toml # generate the default configsudo systemctl restart containerd# kubeadm/kubelet/kubectl (all nodes; the Kubernetes apt repo must be added first, see §11.3)sudo apt-get updatesudo apt-get install -y kubelet kubeadm kubectlsudo apt-mark hold kubelet kubeadm kubectl # stop unattended upgrades of these packages# Control plane: CIDR must be the one your CNI expects (192.168.0.0/16 = Calico default)sudo kubeadm init --pod-network-cidr=192.168.0.0/16# kubectl for a non-root user (on the control plane)mkdir -p $HOME/.kubesudo cp -i /etc/kubernetes/admin.conf $HOME/.kube/configsudo chown $(id -u):$(id -g) $HOME/.kube/config# Each worker: paste the join command printed by kubeadm initsudo kubeadm join <control-plane-endpoint>:6443 --token <TOKEN> --discovery-token-ca-cert-hash sha256:<HASH>
sysctl settings for bridged traffic enabled (see §11.3 / §11.4).
Required ports open between nodes.
Check the distro docs and the CNI provider docs for exact requirements.
[!WARNING]
Exam traps / remember:
--pod-network-cidr must match the CNI: Calico default 192.168.0.0/16, Flannel default 10.244.0.0/16.
kubectl is not required on workers. kubeadm + kubelet + runtime are required on every node.
The containerd config default above leaves SystemdCgroup = false. kubeadm configures the kubelet with the systemd cgroup driver, so set SystemdCgroup = true as well (§11.3).
The join command is printed once. If you lose it: kubeadm token create --print-join-command (§11.3).
[!NOTE]
Beyond the course:
The course says to install the CNI before joining workers. The order can be swapped: nodes join fine without a CNI, they just stay NotReady until it is running (the §11.4 lab joins first).
Local practice cluster of 3 VMs: kubemaster (control plane) + kubenode01, kubenode02 (workers).
Hypervisor VirtualBox, with Vagrant to build identical VMs with a single command, so the setup is reproducible and the network/host config is consistent.
Prerequisites on the host: VirtualBox (virtualbox.org) and Vagrant (vagrantup.com/docs).
The Vagrantfile and provisioning scripts are in the course repo github.com/kodekloudhub/certified-kubernetes-administrator-course.
git clone https://github.com/kodekloudhub/certified-kubernetes-administrator-course.gitcd certified-kubernetes-administrator-coursels -la # Vagrantfile should be listed
[!CAUTION]
Correction: with MASTER_IP_START = 1 / NODE_IP_START = 2 the master would get 192.168.56.2. The IPs used in the demo (§11.3: master .11, workers .21/.22) need MASTER_IP_START = 10 and NODE_IP_START = 20for the excerpt’s + i formulas. Other repo revisions may use master .11 directly; inspect the actual Vagrantfile rather than assuming the snippets match.
A Guest Additions version mismatch warning (e.g. 5.2.42 vs VirtualBox 6.1) normally does not break SSH or provisioning. If synced/shared folders fail, install matching Guest Additions in the VM or upgrade VirtualBox on the host.
[!NOTE]
Beyond the course:ubuntu/bionic64 is Ubuntu 18.04 (past standard support, with old containerd/cgroup defaults). Choose a box/runtime supported by the Kubernetes version you install; package-repository access alone does not guarantee OS/runtime compatibility. VirtualBox 6.1.28+ only allows host-only IPs in 192.168.56.0/21 by default, which is why the lab uses 192.168.56.x.
In the Vagrant workflow table, add to the vagrant status row: vagrant status <name> shows the state of one VM (e.g. vagrant status kubemaster).
[!NOTE]
Beyond the course: repository layouts can change. Locate the Vagrantfile before vagrant up; in later course repo layouts it is under kubeadm-clusters/virtualbox/, rather than the repo root. Check the actual box and IP formulas there.
Cluster traffic goes over enp0s8. Check it with ip addr show enp0s8 (look for the inet 192.168.56.x/24 line).
Follow the official docs (in the exam you have kubernetes.io open): Installing kubeadm (/docs/setup/production-environment/tools/kubeadm/install-kubeadm/), Creating a cluster with kubeadm (…/create-cluster-kubeadm/, single control plane), Creating Highly Available Clusters with kubeadm (…/high-availability/), Container Runtimes (/docs/setup/production-environment/container-runtimes/).
Docs prerequisites: a deb/rpm-compatible Linux host, ≥ 2 GB RAM per machine, ≥ 2 CPUs on control-plane machines, full network connectivity between all machines (public or private), unique hostname, MAC address and product_uuid on every node, required ports open.
kubeadm builds a minimum viable cluster that passes the Kubernetes conformance tests. It also handles bootstrap tokens and cluster upgrades (§6.6).
Diagram (new): bootstrap order per node role, plus the artefacts kubeadm init creates (paths/add-ons are beyond the course text).
kubelet and the container runtime use cgroups to enforce pod/container resources (requests/limits). Both must use the same cgroup driver.
Driver
Behaviour
Use when
cgroupfs
kubelet and runtime write directly to the cgroup filesystem. kubelet's built-in default
Not recommended when systemd is the init system (that gives two cgroup managers and nodes become unstable under resource pressure). Don't use with cgroup v2
systemd
systemd (PID 1) owns the root cgroup and acts as the cgroup manager
Init system is systemd (modern Debian/Ubuntu), and always with cgroup v2
kubeadm ≥ v1.22 defaults the kubelet to systemd, so containerd must be set to match.
IP the API server advertises to the cluster (used in the join command and API server cert): the master's IP on the cluster network (enp0s8)
--pod-network-cidr
Pod IP range. Must match the CNI (Flannel default 10.244.0.0/16)
--upload-certs
Uploads the control-plane certs to the cluster and prints a certificate key used when joining additional control-plane nodes
--control-plane-endpoint
Stable VIP/LB DNS or IP for all control-plane nodes. Set it from the start if you might move to HA later
--cri-socket
Point to the runtime explicitly if kubeadm can't detect it, e.g. unix:///var/run/containerd/containerd.sock
kubeadm init runs preflight checks, pulls images, creates certificates and static pod manifests, then prints: (1) the kubeconfig setup commands, (2) a reminder to deploy a pod network, (3) the kubeadm join command (token + discovery hash), and (4) the certificate key if --upload-certs was used.
Your Kubernetes control-plane has initialized successfully!To start using your cluster, run as a regular user: mkdir -p $HOME/.kube sudo cp -i /etc/kubernetes/admin.conf $HOME/.kube/config sudo chown $(id -u):$(id -g) $HOME/.kube/configYou should now deploy a pod network to the cluster.kubeadm join 192.168.56.11:6443 --token <token> \ --discovery-token-ca-cert-hash sha256:<hash>
mkdir -p $HOME/.kubesudo cp -i /etc/kubernetes/admin.conf $HOME/.kube/configsudo chown $(id -u):$(id -g) $HOME/.kube/configkubectl get nodes # master shows NotReady until a CNI is installed
sudo kubeadm join 192.168.56.11:6443 --token <token> \ --discovery-token-ca-cert-hash sha256:<hash># Lost/expired join command? On the master:kubeadm token create --print-join-command
Verify on the master: kubectl get nodes (all Ready, workers have role <none>) and kubectl get pods -n kube-flannel (one kube-flannel-ds-xxxxx pod per node).
kubectl run web --image=nginx --restart=Neverkubectl get pod web # expect Runningkubectl describe pod web # if not: events (scheduling, CNI, image pull)kubectl logs pod/web
The repo URL contains the minor version (/v1.31/). Installing a different minor means changing the repo line (same issue on upgrades, §6.6).
Before init/join on every node: configure swap, sysctls/br_netfilter, a runtime with matching cgroup driver, and installed/held packages. There is no required order among those prerequisites.
A mismatched cgroup driver (containerd false vs kubelet systemd) gives unstable or crash-looping control-plane pods after init.
On multi-NIC VMs set --apiserver-advertise-address to the cluster-network IP (enp0s8).
Nodes stay NotReady until the CNI pods run. That is not a kubelet bug.
Workers show ROLES <none>. That is normal.
[!NOTE]
Beyond the course:
net.bridge.* sysctls exist only after the br_netfilter module is loaded. Load it (and overlay) now and persist across reboots:
The current docs only strictly require net.ipv4.ip_forward = 1. The bridge settings depend on the CNI.
kubeadm init writes certs to /etc/kubernetes/pki, kubeconfigs (admin.conf, kubelet.conf, controller-manager.conf, scheduler.conf, plus super-admin.conf since v1.29) to /etc/kubernetes/, and static pod manifests to /etc/kubernetes/manifests/. kube-proxy and CoreDNS are deployed as add-ons.
Bootstrap tokens expire after 24h by default (kubeadm token list shows TTL). The --upload-certs certificate key/secret expires after 2h.
On Vagrant, Flannel may bind to the NAT NIC. If pods on different nodes can't reach each other, add - --iface=enp0s8 to the args of container kube-flannel (runs /opt/bin/flanneld) in DaemonSet kube-flannel-ds: kubectl -n kube-flannel edit ds kube-flannel-ds. Also make sure the kubelet's --node-ip is the enp0s8 IP (kubectl get nodes -o wide shows INTERNAL-IP).
Every kubeadm init option can also go in a config file (kubeadm init --config kubeadm.yaml, with ClusterConfiguration: networking.podSubnet, controlPlaneEndpoint). Recovery after a failed attempt: sudo kubeadm reset.
Add to the docs bullet: the 'Installing kubeadm' docs page is written for one Kubernetes version (v1.31 in the demo) and links to per-version pages for older releases. Open the page for the version you are installing, because the repo URL and package versions differ.
[!NOTE]
Beyond the course: kubeadm’s automatic IP selection can choose the default-route NIC (often the Vagrant NAT interface), so select the reachable cluster-network address explicitly.
APT "duplicate sources" warnings are harmless. A /usr/sbin/policy-rc.d returned 101 message just means services are blocked from auto-starting during install. kubeadm configures and starts the kubelet later.
[!CAUTION]
Correction:apt.kubernetes.io / packages.cloud.google.com were frozen and then shut down, so these commands fail today. Use the pkgs.k8s.io repo for the minor you want, and note the different package version format:
curl -fsSL https://pkgs.k8s.io/core:/stable:/v1.26/deb/Release.key | sudo gpg --dearmor -o /etc/apt/keyrings/kubernetes-apt-keyring.gpgecho 'deb [signed-by=/etc/apt/keyrings/kubernetes-apt-keyring.gpg] https://pkgs.k8s.io/core:/stable:/v1.26/deb/ /' | sudo tee /etc/apt/sources.list.d/kubernetes.listsudo apt-get updateapt-cache madison kubeadm # list exact available versionssudo apt-get install -y kubelet=1.26.0-2.1 kubeadm=1.26.0-2.1 kubectl=1.26.0-2.1
3. kubectl before init (controlplane): kubectl get nodes errors (course output: error: the server doesn't have a resource type "nodes"). That is expected because there is no API server or kubeconfig yet.
[!NOTE]
Beyond the course: without a kubeconfig, the usual message is The connection to the server localhost:8080 was refused - did you specify the right host or port?. It means the same thing.
4. Init (controlplane only)
ip addr show eth0 # find the IP to advertise, e.g. inet 192.7.220.6/24sudo kubeadm init --apiserver-advertise-address=192.7.220.6 --pod-network-cidr=10.244.0.0/16# kubeconfig as a regular usermkdir -p $HOME/.kubesudo cp -i /etc/kubernetes/admin.conf $HOME/.kube/configsudo chown $(id -u):$(id -g) $HOME/.kube/config# ...or stay rootexport KUBECONFIG=/etc/kubernetes/admin.confkubectl get nodes # controlplane NotReady control-plane 33s v1.26.0
--pod-network-cidr must always match the CNI you will install (Flannel → 10.244.0.0/16).
Copy the printed join command, e.g. kubeadm join 192.7.220.6:6443 --token 6cv4ox.ea6gvfim94c9igu --discovery-token-ca-cert-hash sha256:eafde364…bff702.
Join tokens expire. If the token has expired, run kubeadm token create --print-join-command on the control plane.
Expected output: preflight checks → reads config from the cluster → writes the kubelet config /var/lib/kubelet/config.yaml → starts the kubelet → CSR sent to the apiserver and approved → "This node has joined the cluster".
Check on controlplane: kubectl get nodes.
6. Flannel (controlplane)
kubectl apply -f https://github.com/flannel-io/flannel/releases/latest/download/kube-flannel.ymlkubectl get pods -A # flannel pods Running, others Running/Completedkubectl get nodes # controlplane Ready control-plane / node01 Ready <none>, both v1.26.0
[!CAUTION]
Correction: the lab text says to look for the Flannel pods in kube-system. The current manifest deploys them in their own kube-flannel namespace (as the §11.3 output shows). Use kubectl get pods -n kube-flannel, or -A.
7. Validate
kubectl get nodes -o wide # node IPs (INTERNAL-IP), OS, runtime, versionskubectl get pods -A # everything across namespaceskubectl get pods -n kube-system # kube-proxy, coredns, control-plane static pods
[!WARNING]
Exam traps / remember:
Run steps 1–2 on both nodes. Run init, kubeconfig and the CNI on the control plane only. Run join on the worker only.
Use the IP of the right interface for --apiserver-advertise-address (ip addr show eth0). The join command reuses this IP and port 6443.
Pin all three packages to the same version and apt-mark hold them. With the legacy repo the version format was 1.26.0-00. With pkgs.k8s.io the package revision varies (e.g. 1.26.0-2.1, 1.26.1-1.1); confirm the exact available version using apt-cache madison kubeadm before installing.
kubeadm join needs sudo. Use the exact printed command (both token and CA cert hash).
A node is NotReady until the CNI is running. Check the CNI pods before you debug the kubelet.
[!TIP]
In the exam you can copy the whole install sequence from kubernetes.io: "Installing kubeadm" (repo + packages) → "Container Runtimes" (sysctl, containerd cgroup) → "Creating a cluster with kubeadm" (init, kubeconfig, join). kubeadm init --help lists every flag.

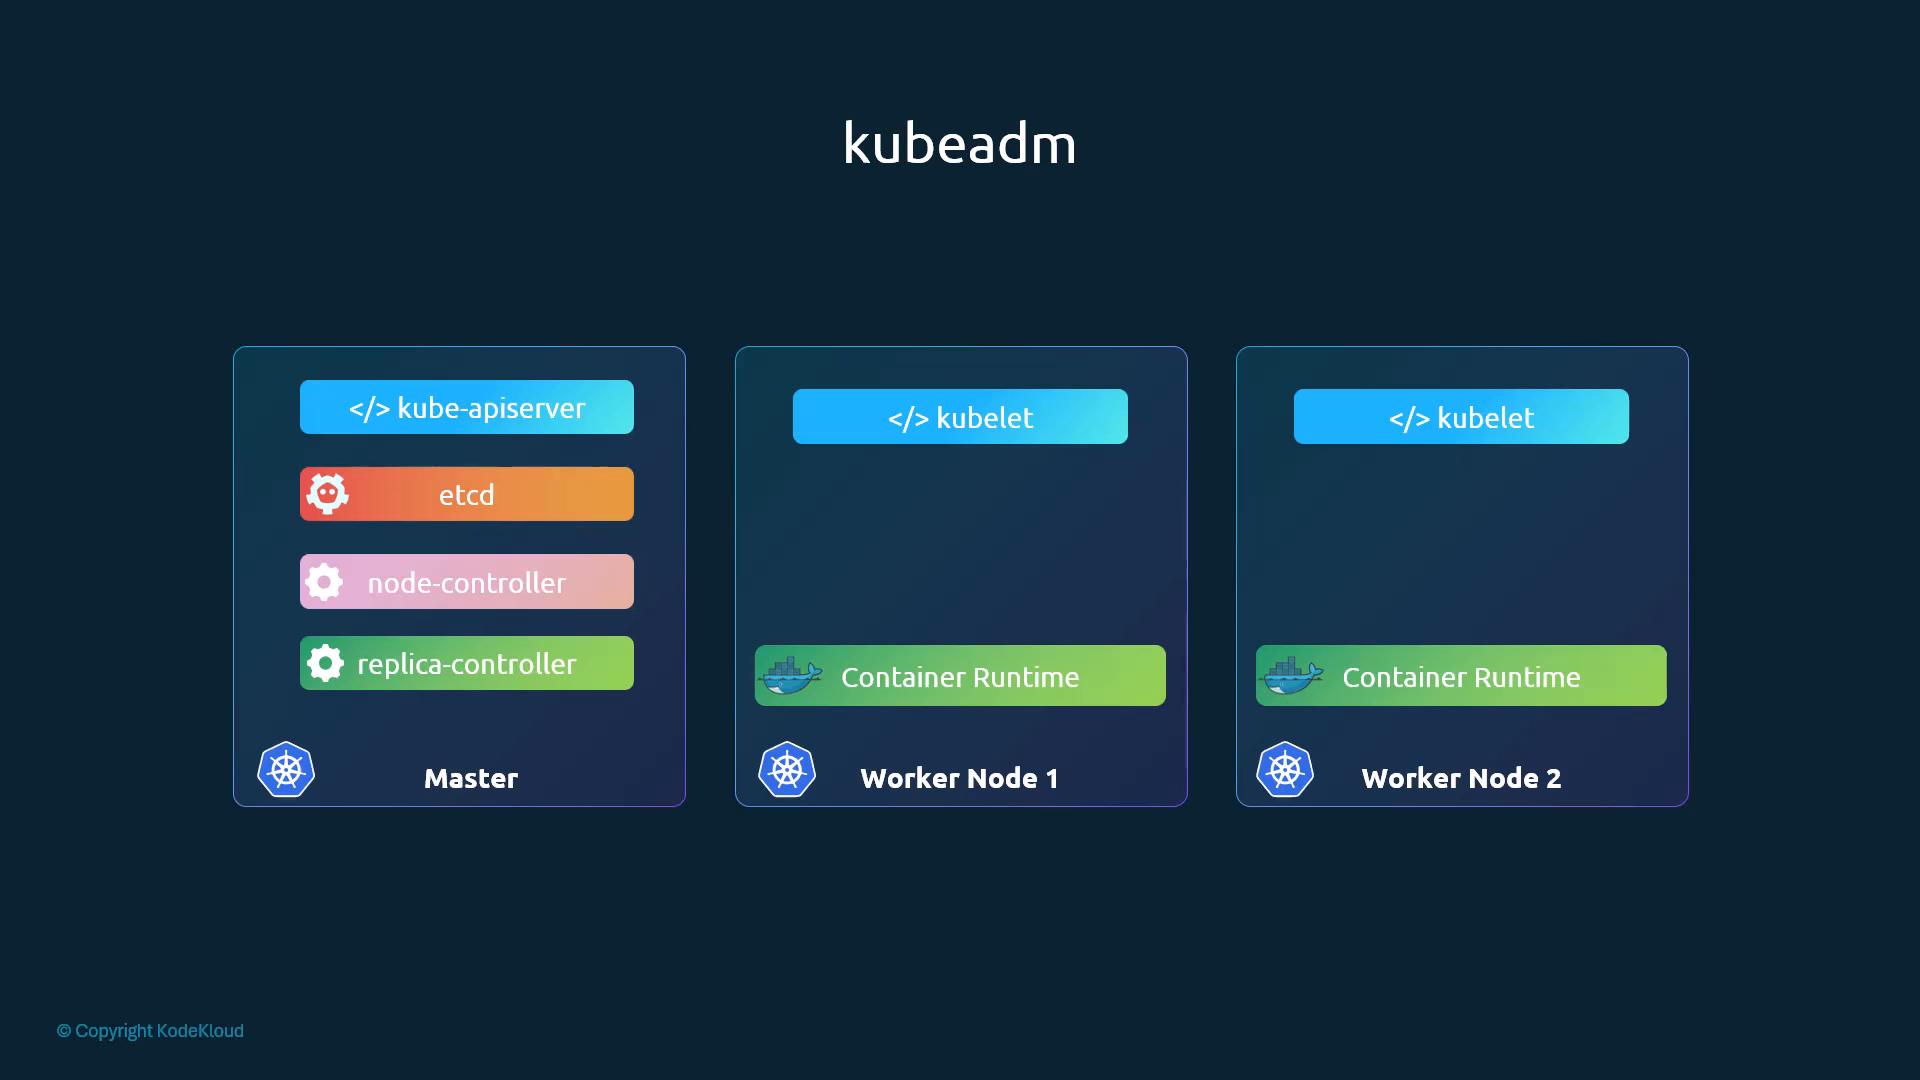
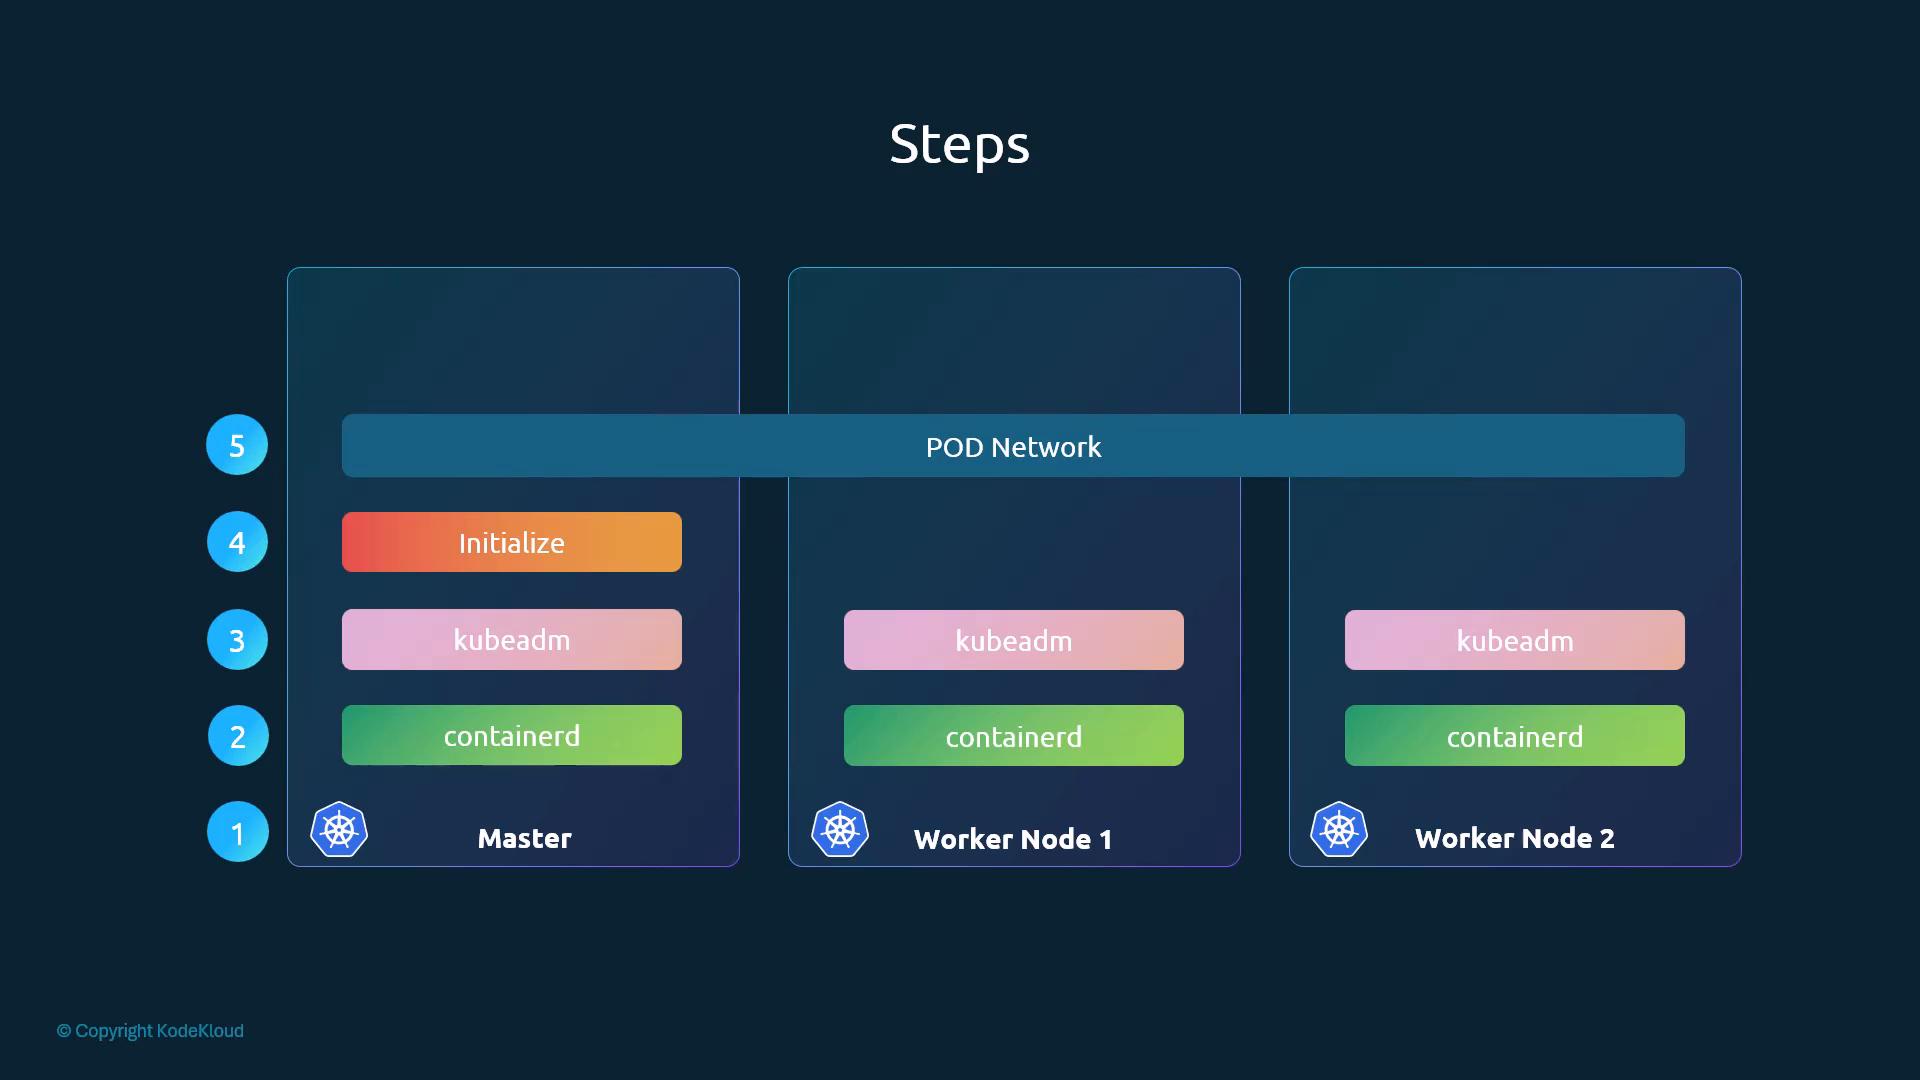
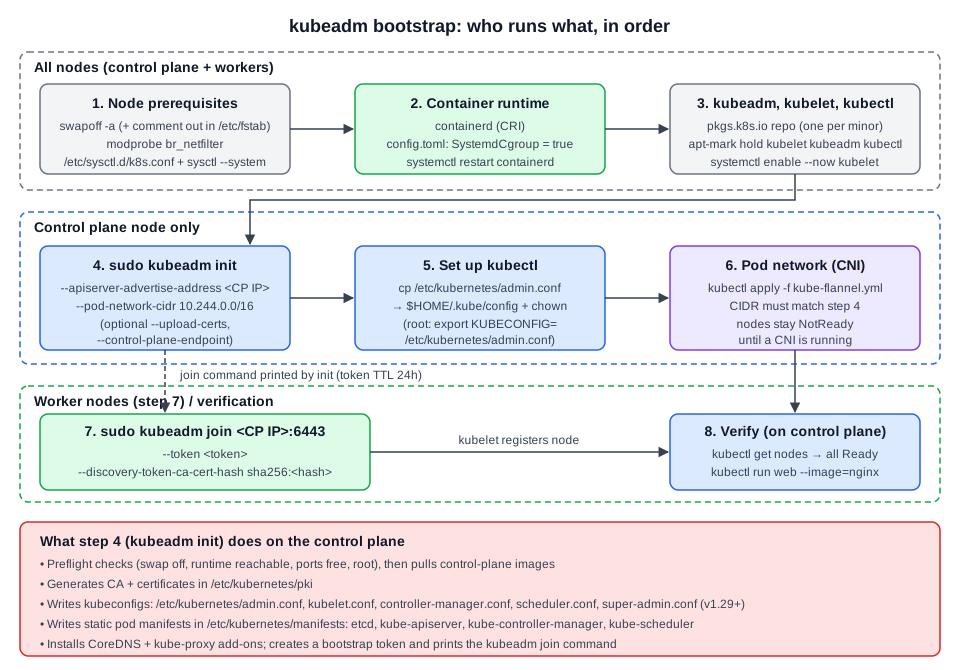 Diagram (new): bootstrap order per node role, plus the artefacts